Wednesday, December 29, 2010

Flip Books


The children have been organizing services and goods to be given to our local homeless citizens. After a recent project where we made flip books, some of the kids wanted to include these fun, interactive books in their packages "because they do not have TV and this could entertain them."  This was a proud moments for all of their teachers, to say the least.

Flip books:
-Cut several pieces of card stock into the same size, preferably a rectangular shape.( maybe 2x3 or 3x5)
-Explain how animation works, that having one element of the picture change slightly in each consecutive image can make things look like they are moving. We tried to keep ours simple. If drawing a person, only move the arms. Or start with a small image that gets bigger and bigger.
-Try and keep the drawing to the right side of the cardstock.
-Once you have 10 or more pages, staple them on the left, making sure that the flipping side, the right, are all flush with each other .
-And FLIP!


Tuesday, November 23, 2010

SCRAP Holiday Bazaar

The entire Living School Elementary class,  15 kids aged 5-10, worked very hard for  over a month or so to get ready for the SCRAP Holiday Bazaar. The event spanned the weekend of November 20th and 21st inside the SCRAP store. There were nearly 20 vendors, all of whom sold gifts made almost entirely from reused materials. It was very inspiring to see what other things people made and the creative uses they had for materials.
 The kids all signed up for time slots to come manage the sales. Many of them had incredible sales skills, schmoozing with their public and using their people skills to encourage people to spend. But the quality of their work was really the selling point. We talked a lot about high quality and why it is important to make things well. This is one way we can save them from becoming garbage, one of our top objectives! It was great to see that the things they made at the end of our production period, with all of their practice, had advanced in quality considerably.

 One of our top sellers were our famed sea urchin ornaments. We found the shells at SCRAP. Immediately, we had the idea to turn them into jelly fish using many types of ribbon. The high quality ribbon was all salvaged or donated.

 The little pillows you see here are "Bed Bugs" that the children decorated and sewed. They are filled with grains and lavender. When placed in the microwave for a few seconds they get warm and help with aching muscles or keep you cozy on a cold night.

                           Our display comprised of donated, borrowed and re-used materials.
The garland on the front of the table was made by water coloring paper, cutting out circles and gluing to thread. Immediate, simple and cheap beautification!

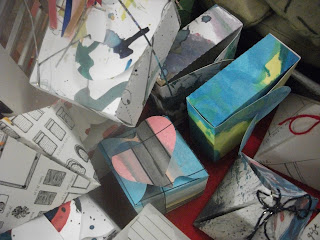
                                       Beautiful hand painted gift boxes sold for only $2.00

These are tile coasters that we decoupaged with the children's drawings, paintings and spin art.
.
 

During a lull, one of our 5 year olds made this pleading sign. Fortunately, when you are working with children you can get away with these blatant attempts. Coming from them, they are adorable.

While this opportunity was invaluable for the children and their life experience, I cannot sign out here without mentioning that WE TOTALLY MADE OUR GOAL for craft sales! We are beyond pleased and happily surprised by the fact that the kids sold nearly all of their crafts. Now, we have been having serious discussions about how to spend (or save) the cash.  The few items we have left have been set up on a makeshift table at school to sell to parents and friends.


If you missed this sale, SCRAP has plans for an ongoing boutique in the near future.

The Elfen Factory

We have been hard at work all month long in preparations for the SCRAP Holiday Bazaar. All of our handmade gifts needed to be made almost entirely of re-used materials. We had a long list of items to make and kept thinking of more. Finally, Michelle and I agreed to stick with: gift tags, gift boxes, magnets, frosted glass votive holders, sketchbooks, eye pillows, garlands and ornaments, including our magnificent pieces des resistances: the Urchin Ornaments ( see picture in next post).


We needed one hardcore day in the shop though, to really churn out those last items. So the class took a field trip to SCRAP to use their workshop. Within an hour we had made more than we ever did in two back at school, it seemed.


The main reason we needed to go there to work was to use the drool-inducing die cut machine. I am not sure who likes this more, the kids or the teachers. This is a wonderful invention that cuts paper and other materials into a desired shape. In our case it was gift tags with a little hole and several box shapes that we could fold into a finished product.


The paper we used for these products we decorated with "spin art"- paint in a salad spinner & watercolor and we used blueprint vellum salvaged at SCRAP. We then finished them off with fancy ribbons.

Thank you to SCRAP for letting us use your space and tools!!

Re Use Center

We finally moved into our new class space in late October. Michelle, another parent and teacher at The Living School and I spent a day setting up and organizing our grand new studio! This is very exciting considering storage of our art supplies last year was in the bathroom.
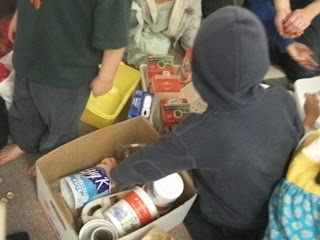
Keri Piehl, the education director at SCRAP ( http://scrapaction.org/ ) came in to help us set up our Re-Use Center. The parents and students have been saving up items for us to re-purpose into art that would otherwise wind up in the trash. Keri also brought some interesting things from SCRAP's inventory to share with us. Included in these items were milk cartons, plastic Easter eggs, red plastic netting that held fruit, odd plastic bits, plastic 2 liter bottles, upholstery strips, etc...

All of the stuff we'd collected was completely disorganized and look well, basically like a bunch of garbage. Keri led the kids in letting them decide the best way to organize it. A few people made suggestions of how we could do this: by size, material, etc...Finally, after a democratic vote they all agreed to sort it out by color.

The kids divided into groups and were in charge of certain colors. It was an organized chaos and there was a lot of mad activity as people went through boxes and piles. It was interesting to hear them discuss what an object's true color was. In some eyes an object was green, in others it was yellow.

Finally, all of our junk was starting to look really pretty. This was seeming to me like a wonderful way to organize just about anything. Color plays such an important role in aesthetics. And it was helping my brain make sense of the jumbled objects.

Once everything had a home, the children made labels to put on the boxes and bins. Some of the bins we had correlated with the objects in them. And they used matching colored pens to make the labels.


I am sure that there are many ways to sort out these objects that are destined to become art. I really had nothing to do with how it all came together as the kids were the ones how led the project. But I am quite pleased with the outcome, being the one who manages the supplies and spends time in the studio. Crayons, paints, paper and other art supplies in a store are organized by order of color and so why shouldn't these supplies? If I was a blue milk jug lid or a purple plastic Easter Egg, I'd be feeling pretty fancy about now.

Tuesday, October 26, 2010

Life Size

Finally we are in our new space! But our classroom and studio are not yet ready for our class. In the meantime we share space with the preschool children. Not being set up in our studio and having limited space makes things challenging for this art teacher. But we sally forth.

Here we are expanding on the idea of the self portrait. One of our focuses or "Big Ideas" has been our anatomy. Oftentimes self portraits are done of the top portion of the body only, the head, shoulders...I wanted to incorporate the rest of our body, which is quite important, in our self image.


A large roll of paper was purchased at SCRAP whose size made it possible for us to trace ourselves. We used Sharpies to make the outline and it was visible on both sides of the paper. Then I encouraged them to draw their "guts" on one side of the paper and then their clothing on the other side.


Alot of attention and time was put into these. Some put themselves in costumes, some focused more on the insides, others on the outsides. The girls really enjoyed having their hair traced, some wanting Pippi Longstocking braids. What I particularly appreciated was that they were working larger and more physically- putting their bodies into drawing their bodies.

Field trip to SCRAP


We took our class on a field trip to SCRAP, all fifteen kids and four adults on the city bus. Keri Piehl, their wonderful Education Director was our host, and had & rich a varied bevy of projects for us. We built structures, discussed the exhibit of masks made from found materials,


and made journals from recycled paper, a rubber band and a dead pen. We decorated the paper by rubbing it with crayons over objects we found in the store that had an interesting texture. Then, folded the paper & punched two holes in it. Then we fed one end of a rubber band through the hole, put it around one end of our pen and then did the same to the other end of the pen. Presto! A beautful journal made from nothing.


My personal favorite activity was the scavenger hunt. Each child was sent into the store to find an object described on a card: a cat toy, something a clown would use, something to help you get organized, something to make you taller, something to help you cook, etc...It was really fun to see how the kids interpreted these things and the creative solutions they found.


I wonder what card this child got?

September Self Portraits

This year is the year that we move into a new, more permanent space in Southeast Portland. We started out our year in a temporary spot on Killingsworth in an old church, owned by the Ethos Music Center (http://ethos.org/) and we are so grateful for their hospitality. They also provide after school music lessons to our kids: ukelele, guitar and choir.


Here we are in that space, where we resided until early October. Being the flexible bunch that we are we were able to carve out a very fun and functional space there. Our art studio consisted of a couple of shelves with a few bare essentials. Our first few projects were based on self portraits. We always start and end the year with a self portrait in order to chronicle the child's growth, in how they see themselves and in their skill.


This self portrait project was to illustrate a depiction of ourselves while exploring the technique of reverse painting. This is a technique that has been around since the Middle Ages and is usually done on glass. I found several plexiglass sheets at SCRAP (http://scrapaction.org/), my favorite place to find materials, which is much safer for the children to paint on.

I explained that essentially, we paint backwards. Things that we would usually add last to a painting we needed to add first. Elements such as black outlines, lips or the whites of the eyes had to be considered with this in mind. They totally got the concept and here are a few examples. ( the one above is hanging in a window). For some reason that I am trying to pinpoint, painting on a clear surface and then showing us the "back" gives a very pleasing, "finished" look.

Monday, October 25, 2010

Introduction

The Living School is a grade school located in Portland, OR that serves grades K through 5. We are currently growing and plan to include grades up to 8. We use the Reggio Emilia and Education for Life philosophies for learning. These philosophies focus on allowing us to create curriculum that is based on the interests and needs of the children. Here, they are encouraged to pursue their personal interests when approaching projects and activities. Through methods of research, experimentation and exploration is how they attain answers to the questions brought on by their voracious curiosity.

Art is a cornerstone to this type of learning as the process of making things is how we exercise creativity, logic, math, appreciation for nature, knowledge of chemistry, culture, critical thinking, problem solving and so much more. So, in this art class I try and stay less product-focused and put more emphasis on what we learn along the way. Reggio Emilia has a strong tradition in re-use materials and the bulk of what we use are found, re-use or donated materials. I find that using found materials lends itself to more creativity because the artist is forced to repurpose the object and leads us to think outside of the box.

In this class we do not plan the curriculum at the beginning of the year. It is a dynamic process that changes with the guidance of the children. While we have benchmarks and goals for the year, the projects themselves are led by their interests. As they discover new things we stay flexible and "plug in' projects that keep up with their interests while facilitating that which we want them to learn. So, you can watch along with us, as our year in art unfolds and see how the organic process of making art with The Living School works.

My name is Kjirsten Winters and I am a mother of two who attend The Living School as well as the school's art teacher. This is my second year teaching art to the elementary school children. My favorite part of teaching these children, besides the fact that they are curious and enthusiastic about learning and art in general, is the process of how we teach and watching "magic" happen when we do not try and control the curriculum. When we stand back and trust the process then the pieces fall into place and the childrens' natural desire to learn flourishes.