Thursday, April 28, 2011

Murals

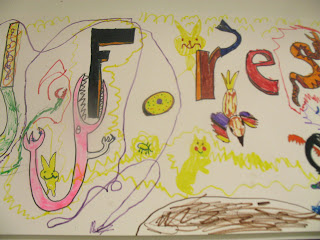
We took a break from our focus on film to do something a little less structured. Our bathrooms were in need of some visual enhancement so we decided to make some murals for them. Instead of painting directly on the wall we used some of the large white rolls of paper that we have. We used tempera paint and collage elements. The lining we did with paint pen.

As far as planning, the children drew individual images on paper and then when it came time to do the mural they all just picked a spot and began replicating what they'd drawn. In some cases we used an opaque projector or overhead projector to copy the images exactly. Some people just freehanded it. The drawings were first done in pencil to be certain of what they wanted and where. Then, they outlined that in black pen. Next, paint was added and our aim was to have every bit of paper covered by paint. This basic trait is often the key to a child's art piece having a finished look, in my opinion. While my ultimate goal is to have the children have complete control over the final piece we did allow ourselves to go in at the end to do the outlining. It was a wonderful collaboration, I'd say.

The kids chose the two themes of: The Natural World and The Mystical Forest. They divided themselves up into groups based on what sounded interesting to them. Here, I will allow the pictures to speak for themselves. I really enjoy the detail.

The Natural World


The Mystical Forest


Monday, April 11, 2011

Phenakistoskopes

In further preparation for our silent film we are planning to complete in June, we have made more motion picture toys. This one is called a Phenakistoscope (\Phen`a*kis"to*scope\)- hard to say but easy to make. It is an early animation device that has roots in ancient times but took off in popularity around 1829.
What you need: cardboard, a compass,paper, scissors, glue stick or double stick tape, a pushpin and a pencil with an eraser or chopstick.
To make one: First, we cut out a (perfect) circle of cardboard to a size of our liking. This is about 9" in diameter. Then cut notches out, equally spaced, about 1/4 inch wide and 1 inch in length, as seen above.
On a separate circle of paper that fits within our notches, we drew sequential images that will make up our animation. Here, the artist is drawing a skull who opens its mouth. A simple image that uses only one changing element works best when first trying this project.
 Once your artwork is complete place a pushpin in the middle of the circle that attaches to a stick or eraser of a pencil in the back. Then stand BEHIND your phenakistoscope and look throught the notches, into a mirror, as you spin it.  The notches break up your vision and create the animated effect. We did not make videos of ours but here is a Youtube link for you to see how it works.

Saturday, April 9, 2011

February- "Friendship Day"

On February 14th, Keri from SCRAP came to help us make "Friendship" or Valentine's Day presents for our loved ones.
She brought some old pins left over from the library's summer reading program for us to cover with red sparkly vinyl. The we decorated it with more shapes and sharpie pens.


One of the favorite project she brought was Iris Paper folding using reused bits of wrapping paper. Here, you cut out a window in a piece of paper and then "fill" it by layering folded ribbons of wrapping paper and taping them to the back of the window. Keep layering in a pattern and finally you have a beautiful, dimensional design.


Naylan, here, even added a door for his window to add that extra element of surprise.


Monday, January 24, 2011

The Overhead Project

We have begun a multi media class in The Living School with another parent as the teacher. The children have begun to write their own screenplays, shoot, direct and edit some of their own short films. The goal is to be ready for the Youth Silent Film Festival this June.
So, I have decided to flesh that out with a little history of photography and the moving picture.  The previous exploration of the flip book phenomenon was part of this concept. Next, we talked about the Camera Obscura, (meaning "Dark Room") whose invention can be dated back as early as the 4th century BC, with writings about it attributed to Aristotle.  It is considered the seed that grew into the film camera we know today. There above, you see a drawing of what one looked like. The idea behind this contraption is that if a bright light is shone through a tiny pinhole, the image on the outside of the box is shone upside down on the inside of the box. This instrument was  used  presumably by artists to project and copy images for paintings.

Today, we have other devices that project images on the wall to help us enlarge and copy as well as other uses. The overhead projector is a more common instrument that we use today. It uses reflection instead of a pinhole to project and image but it is like the camera obscura in that the image is upside down.

Keri, our patron saint at SCRAP,gave us a huge bag of clear colored plastic items she had been collecting to play with on our projectors. I wanted to get the kids thinking about shadow puppets and gave them all of this 'junk' to play with to get the creativity flowing. I also showed them some overhead projector shadow puppet plays on YouTube that were very well done. They were doing color-mixing, exploring textures, cutting out their own shapes and letters for title cards and using all of the parts of the projector for various effects. By then end of the class time we had 3 different plays being created and one wildly colorful psychedelic/disco light show, complete with soundtrack, happening on the wall.

Wednesday, January 5, 2011

Time Machines 2011

Since we all recently 'traveled' from the year 2010 to 2011 and since the children have been studying the concept of time we made Time Machines in art class this week.

I asked them all when they would like to travel to. Among the responses were...

 Sosaia,8, whose older sister, Elizabeth is also in the class, said he would like to go to the time before his sister was born so he could be older than her.

Shaun, 6, said "to the time when I meet boyfriends." Ezra, 5, added,"They'll be driving rocket cars by then!"

Xenia, 8, said she'd go to the future to see " a girl president!"

I based this project on one I read about it the book Beautiful Stuff!Learning with Found Materials
http://www.amazon.com/Beautiful-Stuff-Learning-Found-Materials/dp/0871923882
This is a Reggio Emilia inspired book that documents children bringing in found objects, organizing them and then using them in art projects. It is a huge inspiration for my class. One fundamental use for the objects is to build a sculpture and then do a drawing of it. When we are done, we return the objects for use in future projects. We  have our beautiful drawing to preserve the memory of our creation.


First, I had them take turns grabbing a few objects from the reuse materials. When everyone had 2 or 3, they could go back and gather more.


Then, they  began  to build enthusiastically. Their imaginations were running rampant about all the things their machine could do, the places it could go and the ways it would work. As an adult, I envy their wealth of ideas and energy for attacking them.  They were willing to share ideas with each other, being respectful about not stepping on toes and trying to be helpful. I encourage this kind of sharing, rather than hoarding an original thought, because working together, melding ideas, is how we can improve things. (This works on a bigger, global scale as well!)


When they were done building they got a piece of watercolor paper and sketched it in pencil. Finally, a finishing touch of watercolor brought it to life. The machines seemed to actually work, if we all closed our eyes.
 The Future Machine

 The Silver Arrow

Tuesday, January 4, 2011

Snow Globes

The month of December was spent making gifts, mostly crafts, for our loved ones.  We had several projects going on so that the children could pick what it was they wanted to work on during art class. Book making, magnets, cards and coloring books for the younger siblings were among the ongoing projects.

The final week before our Winter Break we made snowglobes using found material. Old jars and discarded ornaments or salt shakers are transformed into something magical and dazzling with little effort.

What we used:
*A wide mouthed jar, one that will not tip over when turned upside down
* a figurine or other object(s) to glue to the lid, creating the inner "world"
*Silicone adhesive
* distilled or bottled water ( to keep microbes at bay)
* liquid vegetable glycerine ( I found this at the natural foods store)
* glitter or fake snow ( I have heard crushed eggshells work but I haven't tried this myself)

For several weeks beforehand, we saved cool looking,  wide mouthed, glass jars and I found a huge bag of mismatched or broken Christmas figurines at Goodwill for $1.99. I tried several kinds of adhesive, including Gorilla Glue, and found that silicone worked best and dried the fastest.

I had the children each select their object and I helped them glue it to the lid. The silicone is messy and somewhat toxic so I handled that part, while they did all the designing. They then added the glitter that they wanted, choosing from a few different colors.
Then, we added the water and 10 or so drops of the liquid glycerine to help things float and swirl nicely around in the H20.
Finally, we turned our object, glued and dried on to the lid, upside down and into the water-filled jar. Once we were satisfied with the look, the water level and amount of glitter, we sealed the lid of the jar with a bead of silicone. This keeps it from leaking. If you like, you might add a little ribbon around the base for a little extra flair.  Now, Shake it!


Wednesday, December 29, 2010

Flip Books


The children have been organizing services and goods to be given to our local homeless citizens. After a recent project where we made flip books, some of the kids wanted to include these fun, interactive books in their packages "because they do not have TV and this could entertain them."  This was a proud moments for all of their teachers, to say the least.

Flip books:
-Cut several pieces of card stock into the same size, preferably a rectangular shape.( maybe 2x3 or 3x5)
-Explain how animation works, that having one element of the picture change slightly in each consecutive image can make things look like they are moving. We tried to keep ours simple. If drawing a person, only move the arms. Or start with a small image that gets bigger and bigger.
-Try and keep the drawing to the right side of the cardstock.
-Once you have 10 or more pages, staple them on the left, making sure that the flipping side, the right, are all flush with each other .
-And FLIP!


Tuesday, November 23, 2010

SCRAP Holiday Bazaar

The entire Living School Elementary class,  15 kids aged 5-10, worked very hard for  over a month or so to get ready for the SCRAP Holiday Bazaar. The event spanned the weekend of November 20th and 21st inside the SCRAP store. There were nearly 20 vendors, all of whom sold gifts made almost entirely from reused materials. It was very inspiring to see what other things people made and the creative uses they had for materials.
 The kids all signed up for time slots to come manage the sales. Many of them had incredible sales skills, schmoozing with their public and using their people skills to encourage people to spend. But the quality of their work was really the selling point. We talked a lot about high quality and why it is important to make things well. This is one way we can save them from becoming garbage, one of our top objectives! It was great to see that the things they made at the end of our production period, with all of their practice, had advanced in quality considerably.

 One of our top sellers were our famed sea urchin ornaments. We found the shells at SCRAP. Immediately, we had the idea to turn them into jelly fish using many types of ribbon. The high quality ribbon was all salvaged or donated.

 The little pillows you see here are "Bed Bugs" that the children decorated and sewed. They are filled with grains and lavender. When placed in the microwave for a few seconds they get warm and help with aching muscles or keep you cozy on a cold night.

                           Our display comprised of donated, borrowed and re-used materials.
The garland on the front of the table was made by water coloring paper, cutting out circles and gluing to thread. Immediate, simple and cheap beautification!

                                       Beautiful hand painted gift boxes sold for only $2.00

These are tile coasters that we decoupaged with the children's drawings, paintings and spin art.
.
 

During a lull, one of our 5 year olds made this pleading sign. Fortunately, when you are working with children you can get away with these blatant attempts. Coming from them, they are adorable.

While this opportunity was invaluable for the children and their life experience, I cannot sign out here without mentioning that WE TOTALLY MADE OUR GOAL for craft sales! We are beyond pleased and happily surprised by the fact that the kids sold nearly all of their crafts. Now, we have been having serious discussions about how to spend (or save) the cash.  The few items we have left have been set up on a makeshift table at school to sell to parents and friends.


If you missed this sale, SCRAP has plans for an ongoing boutique in the near future.

The Elfen Factory

We have been hard at work all month long in preparations for the SCRAP Holiday Bazaar. All of our handmade gifts needed to be made almost entirely of re-used materials. We had a long list of items to make and kept thinking of more. Finally, Michelle and I agreed to stick with: gift tags, gift boxes, magnets, frosted glass votive holders, sketchbooks, eye pillows, garlands and ornaments, including our magnificent pieces des resistances: the Urchin Ornaments ( see picture in next post).


We needed one hardcore day in the shop though, to really churn out those last items. So the class took a field trip to SCRAP to use their workshop. Within an hour we had made more than we ever did in two back at school, it seemed.


The main reason we needed to go there to work was to use the drool-inducing die cut machine. I am not sure who likes this more, the kids or the teachers. This is a wonderful invention that cuts paper and other materials into a desired shape. In our case it was gift tags with a little hole and several box shapes that we could fold into a finished product.


The paper we used for these products we decorated with "spin art"- paint in a salad spinner & watercolor and we used blueprint vellum salvaged at SCRAP. We then finished them off with fancy ribbons.

Thank you to SCRAP for letting us use your space and tools!!